|
|
Your Skills First, download the image Honolulu.tif (MAC version) HonoluluSysLut.tif (PC version). If you have an Macintosh computer, the file will be saved to the Downloads Directory designated in your web browser. If you have a PC, you will be asked where to save the file. Save the file to an appropriate location. If your browser is so configured, the image will be saved and then opened in your designated image viewer. In either case, make sure you know where the saved version of the image is located. If NIH Image is not already open as a result of the download, find it on your Desk Top, Launcher, or hard drive and start it. Select File/Open and use the dialog box to relocate Honolulu.tif. Click twice on the image file to open it. Now wait a few seconds for the image to appear. If the image appears in shades of gray, select Options/Color Tables/System to get color. Note: If you get the message "This xxxK image is larger than the xxxK Undo buffer. Many operations may fail or be undoable," then carry out the following procedure. If you do not get such a message, skip the procedure. 1. Write down the size of the image listed in the
message. What a view! Mountains! Beaches! Beautiful weather! But now to business. NIH Image has a wide selection of measurement options, but before you actually begin making measurements, you will need to do two things: set the scale of the image, and then select the measurement options you want to use. Setting the scale of the image establishes the units, like kilometers or
miles, of your measurements. Set the scale by determining the length of some feature in
the image. In this image of Honolulu, a scale bar is included in the image itself, at the
bottom edge. (For many satellite images, such as Landsat, you may obtain the width of the
image or the size of a pixel from standard descriptions of the satellite imaging
instruments. If you have no distance information for a particular image, you will need to
find a map of the imaged area with a scale on it that you can use to estimate the size of
some feature in the image.) Set the image scale by selecting the straight line measuring
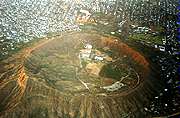
tool in the Tools Bar. Now you need to choose your measurement options. Select Analyze/Options to get a list of the measurement options available to you in NIH Image. Another dialog box will appear. All measurement options with an "X" in the small square cell next to the option name are selected. To select an option, click on the empty cell next to the name of the option and an "X" will appear in the cell. To deselect an option, click on the "X" already in the cell and the "X" will disappear. For now, select only the Perimeter/Length and deselect all other options. Click OK to close the dialog box. Now you are ready to begin your measurements. Place the cursor on the location of the Royal Hawaiian Hotel and click down on the mouse button. While holding the button down, scroll the cursor around the image. The location of the cursor in the image and its linear distance from the starting point are shown in kilometers in the Info box. To make a measurement, scroll the cursor to the desired destination and release the mouse button. The line of marching ants will appear between the starting and ending points. Select Analyze/Measure and then Analyze/Show Results. A data window will appear listing your distance measurement. Additional measurements are made by repeating the process: click on the starting point, drag to the desired end point , and release. Each new measurement will be added to the list in the data window. By definition, the straight-line measuring tool gives distances between two points along a straight line "as the crow flies." Such distances are not very useful to you in this case since you have to travel on surface streets to get from one place to another (unless, of course, you happen to be a Super Hero in disguise!). To get more realistic distances, you need a tool that measures distances along curved and crooked lines. Luckily for you, NIH Image has such a tool! Click and hold on the line measure icon in the Tools bar to get a dialog box. Select the Freehand Line tool and release. Now when you click-and-drag from one point to another in the image, the cursor will trace and measure distances along any path you choose. This time, start at the hotel and trace a line along major roads to reach your target. As before, select Analyze/Measure and Analyze/Show Results to see your measured distance. Now you have a chance to be creative! Measure the distances along several different routes between the hotel and your target destinations. Consider the trade-offs in choosing different routes. For instance, Honolulu boasts a cross-town freeway (designated H1 in the image) which is the best way to get to more distant locations like Waialae. Now you finally have some hard data upon which to base your decisions. Just for fun, try measuring the distances to some of the other points of interest on the image, like the palace or the cemetery. Or you could measure the distance to the Waialae along the coastline and try to convince Dad that it would be faster and more fun to borrow a surf board and ride the waves to the beach by Waialae. Besides, if he came in from the beach, he might get in free (not!). Now that you are getting hooked on working with images, try another kind of measurement--area. Go back to Analyze/Options and select the Area option. Click OK to close the dialog box again. Select Analyze/Reset to delete your previous measurements from the data box. (If you wish, you can save your measurements by selecting File/Export, and saving the file.) Hmmmm, what area shall we measure? If you look to the right from the Hotel, you see what looks like a red-brown ring labeled "Diamond Head." as you can see in the aerial photograph below, Diamond Head is a circular ridge surrounding a central hollow. It is, in fact, an old volcanic explosion crater. A few million years ago, red-hot volcanic rock blasted out of this crater to cover the surrounding land. Now the old crater is used as a city park. Hiking trails crisscross the floor of the crater, and one trail runs all the way around the rim crest.
You can measure both the area of the crater and distance around the rim crest by clicking on the Freehand Line tool, placing the cursor somewhere on the crest, and carefully tracing all the way around the rim. You can start anywhere on the crest, but you must click-and-drag all the way around and close the loop by returning to your starting point before releasing the mouse button. If you don't close the loop, NIH Image thinks you just measured a curved path and give an incorrect number for the area. As before, select Analyze/Measure and Analyze/Show Result to see the length of the crest's circumference and the area inside your loop. The area will be in units of square kilometers.
[ Your Situation ] [ Your Skills ] [ Your Challenge ] [ Home ] [ Teacher Pages ] [ Modules & Activities ] |
![]()
HTML code by Chris Kreger
Maintained by ETE Team
Last updated November 10, 2004
Some images © 2004 www.clipart.com
Privacy Statement and Copyright © 1997-2004 by Wheeling Jesuit University/NASA-supported Classroom of the Future. All rights reserved.
Center for Educational Technologies, Circuit Board/Apple graphic logo, and COTF Classroom of the Future logo are registered trademarks of Wheeling Jesuit University.
 Left:
Diamond Head in Eastern Honolulu is a popular tourist attraction. It
is an extinct volcanic crater. The layers visible in the rim were formed during many
different eruptions. The last eruption occurred about 4 million years ago. Photo: Courtesy of S.K. Croft
Left:
Diamond Head in Eastern Honolulu is a popular tourist attraction. It
is an extinct volcanic crater. The layers visible in the rim were formed during many
different eruptions. The last eruption occurred about 4 million years ago. Photo: Courtesy of S.K. Croft