A particularly good way to organize information about a problem or subject is to construct a "concept map." Construction of concept maps helps us pull together information we already know about a subject and understand new information as we learn.
Concept maps consist of nodes and labeled lines.
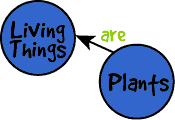
Figure 1
Node is the name for important terms or concepts. Nodes are usually depicted with circles drawn around the term or concept, such as the nodes for "Living Things" and "Plants" drawn above (Figure 1). Lines between nodes show which concepts are related. The label on the line tells how or in what way the concepts are related. For example, plants "are" living things.
We can use concept maps when we begin working together on a problem, during the problem solving steps, and at the end of problem solving.
Steps to Constructing a Concept Map
(adapted from White and Gunstone, 1992)
1. Write down the major terms or concepts you know about a selected topic. For example, if we are studying living things, some of the terms might include: animals, dogs, plants, cows, or grass (Figure 2).
2. Write each concept or term on a separate piece of paper or 3 x 5 card.
3. Sort through the cards, putting terms you DO NOT understand to one side. Also put aside those that ARE NOT related to any other term. The cards left over are the ones we will use to construct the concept map.
4. Arrange the cards so that related terms are close to each other.
5. Stick the cards to a piece of paper as soon as you are satisfied with the arrangement. Leave a little space for the lines we'll draw. Here is what your terms might look like if you used the ones we mentioned above:
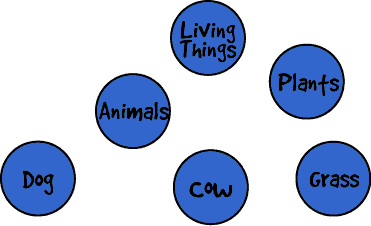
Figure 2
6. Draw lines between the terms you think are related.
7. Write on each line the nature of the relationship between the terms. Here is what the terms above might look like after we draw the lines (Figure 3):
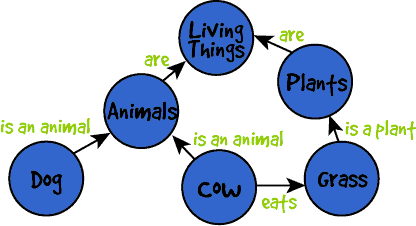
Figure 3
8. If you put any cards aside in step 3, go back and see if some of them will fit into the concept map you have constructed. If they do, be sure to add the lines and relationships of the new items.
9. Summary: The concept map drawn in Figure Three is very simple. Maps can become very complex and require a great deal of your time and attention, but they are useful in organizing, learning, and demonstrating what we know about a particular topic.
Extension: How would you arrange the following terms to fit into the concept map drawn above: Beagle, rocks, rose, hunting, guard dog, rabbit?
References
Shavelson, R.J., Lang, H., & Lewin, B. (1994). On concept maps as potential
"authentic" assessments in science (CSE Technical report No. 388). Los Angeles,
CA: National Center for Research on Evaluation, Standards, and Student Testing (CRESST),
UCLA.
White, R. & Gunstone, R. (1992). Probing understanding. New York: Falmer Press.